Knowledgebase

Access Emails using outlook web in the browser.


1. Open your browser on the desktop/laptop >> Browse the Url https://mail.mcgm.gov.in.
(This URL will only work after MCGM live from O365, until that user can access outlook web url using “https://outlook.office.com”)


2. Type the MCGM email address with complete domain of MCGM (e.g. test@mcgm.gov.in )and click on Next.


3. After that click on Next, now Password page will appear >> Type the password of email account and click on Sign in.

4. You are Logged in.

Thanks !!

How to Create a folder

  1. Right-click Inbox and select New Folder.
  2. Type a name for the folder and press Enter.

Move messages into a folder

  1. Select an email message.
  2. Drag and drop it into a folder.

Add a folder to Favorites

  • To add a folder to Favorites, right-click the folder, and then select Show in Favorites.

                 Note: You can also select the folder, and then drag and drop it in Favorites.

How to Create a rule on a message

  1. Right-click an existing message and select Rules > Create Rule.
  2. Select a condition, and what to do with the message based on the condition.

For example, to move messages with a certain title to a specific folder, select the Subject contains condition, select Move the item to folder, select or create a New folder, and then select OK.

  1. When you're done creating the rule, select
  2. To use the rule right away, select the Run this new rule now on messages already in the current folder checkbox, and then select OK.

The message now appears in that folder.

Create a rule from a template

  1. Select File > Manage Rules & Alerts > New Rule.
  2. Select a template.

For example, to flag a message:

  • Select Flag messages from someone for follow-up.
  1. Edit the rule description.
    • Select an underlined value, choose the options you want, and then select OK.
  2. Select Next.
  3. Select the conditions, add the relevant information, and then select OK.
  4. Select Next.
  5. Finish the rule setup.
    • Name the rule, setup rule options, and review the rule description. Click an underlined value to edit.
  6. Select Finish.

Certain rules will only run when Outlook is on. If you get this warning, select OK.

  1. Select OK.

Thanks..!!

To create new ticket.

Login to portal using your email ID as user name (E. test.01@mcgm.gov.in)and default password: mcGMSupport@789

STEP BY STEP TICKET CREATION PROCESS

Go to the Login area and enter credentials you received.


1) Login to the portal as user.
Note: Your Email ID will be used as your user name so enter full email ID
with domain like test.01@mcgm.gov.in.


Enter the email id in user name and password default : mcGMSupport@789 .

And click on login.


2) Once you successful logged in you will find "Submit Ticket"  then Click on
Submit Ticket to create new ticket for your issue/concern.


3) You will get new pop up window in that Select Department “General” by
default and click on next.


4) On next page go to priority and select the priority as per Issue/Concern
criticality, then Enter subject to describe your exact issue

Then Enter your Name, Employee Code and email ID

Write details you want to give about issue to understand better and Click on Submit
(check mark the box before submits).


Once click on Submit your ticket will be created. To verify the created
ticket, go to “My Tickets” and click on it. You will find new created ticket
here and the details about old tickets which you created previously.


5) Click on My Ticket.
On “My Tickets” you will find new created ticket as well as old tickets which
you created previously along with some details.

Thanks !!

  1. Select the search bar, located above the Outlook ribbon. 

  2. Type a name, subject, or phrase which is included in the email message that you want to find. You can use quotation marks around a phase to search on words in that exact order. 

Refine your search results

  1. Select the search bar and type a name or subject.

  2. Select an option to refine or widen your search: All Mailboxes, Current Mailbox, Current Folder, Subfolder, or All Outlook Items.

  3. You can also select a category within the Refine group to further filter your search results:

    • From – only shows results from a specific person.

    • Subject - only shows results based on the subject.

    • Has Attachment – only shows emails that have attachments.

    • Categorized – only shows results that have a specific category assigned to them.

    • Sent To – searches messages Sent to You, Not Sent Directly to You, or Sent to Another Recipient.

    • Unread – only shows unread messages.

    • Flagged - only shows messages flagged by you.

    • Important - only shows emails marked as Important.

    • More - filters your results based on more advanced criteria, such as Cc or Sensitivity.

  4. Select Recent Searches to run recent searches again.

    Note: Outlook saves only the recent search query, not the results.

  5. Select Close Search to close the Search tab.

Thanks..!!

How to login to Helpdesk ticket board and create ticket

Below is the step by step by process to login in to ticket portal and create new ticket.

1. Browse the below URL:

 Open any web browser and enter below URL to access the ticket portal
https://mcgm.esdsconnect.com/index.php
 Enter User Name as EC code and Password as domain password.
 Now Click on Login

2. Now on the next page you will get below screen:

 Click on Submit a Ticket to create new ticket.

3. You will get below screen then select suitable option to create ticket for and click on next

4. Fill up required details and Click on Submit.

5. Your ticket will be created for the related query and ticket no will be shown as below.

6. You can go to My Tickets and confirm about created ticket.

7. You also can see the update and progress in my tickets on the particular ticket by opening it.

For more details refer attached file.

****** Thank You !! ******

How to Set a Follow Up flag

  1. Select the email message.
  2. Select the .
    The flag turns red and a Follow up message appears in the header of the email message.

Note: Follow Up flags are used for actionable items only.

View all Follow Up Flags

  1. Select View >To-Do Bar >Tasks.

  1. The To-Do Bar pane opens and shows all flags.

Remove a Follow Up Flag

  1. Right-click the email message.
  2. Select Follow Up > Mark Complete.

    The Follow Up Flag changes to a green check-mark and is removed from the To-Do Bar.

How to Set a Reminder

  1. Select the email message for which you want to set the reminder.
  2. Select Home >Follow Up > Add Reminder.
  3. In the Custom box, for Flag to, select Follow up or type a description.
  4. Check the Reminder box, enter date and time, and then select OK.

An alarm bell icon will appear on the message.

  1. To change the time for the reminder, select Follow Up, select Add Reminder, edit the time, and then select OK.

Find an Action Item

  1. If Outlook finds something in an email that looks like an action item, an Action items tab automatically appears on the reading pane.
  2. Select the Action Items drop-down arrow to read the action item, and then select FOLLOW UP if you'd like to set a Follow Up Flag to remind you to do that action item.

Note: If you select FOLLOW UP, the action item displays in the To-Do Bar pane.

  1. When the task is done, mark it complete.
    • From the Action Items drop-down, select Mark Complete, or
    • In the To-Do Bar pane, right-click the flagged message and select Mark Complete.

How to Create color categories

  1. Select Home > Categorize > All Categories.
  2. To Rename a category color, in the Color Category box, select a color category, and then select Rename. Type an appropriate name for the selected category, and then press Enter.
  3. To change the category Color, select the color you want from the Color drop-down .
  4. To create a New color category, select New, type a name, select a color, and select OK.
  5. When you are done with Color Categories, select OK.

Assign an email a color category

  1. Right-click an email message.
  2. Select Categorize, and then select an appropriate color category for the message

Thanks..!!

How to Schedule a Teams meeting

Outlook on the desktop

  1. Open Outlook and switch to the calendar view.

  2. Select New Teams Meeting at the top of the view.

    New Teams Meeting in Outlook

    Note: Even if you begin by selecting New Meeting or New Appointment, you can make it a Teams meeting by selecting Teams Meeting at the top of the new event form.

  3. Add your invitees to the Required or Optional field(s)—you can even invite entire contact groups (formerly known as distribution lists).

  4. Add your meeting subject, location (if applicable), start time, and end time.

  5. Create your message.

  6. Select Send.

Note: The Teams meeting join details are added to the meeting invite automatically.

If you don’t see the New Teams Meeting icon in the desktop version of Outlook, the Teams add-in for Outlook might not be installed properly.

Outlook on the web

  • In the new event form, select the Teams meeting toggle to turn it on.

    The Teams meeting toggle is on the right

After the invite is sent, you'll see the meeting join details in the event.

How to Remove Teams from a meeting

You can remove Teams from a meeting while you're creating the meeting, but not after you send the invitation.

Outlook on the desktop

  • At the top of the new meeting form, select Settings > Don't Host Online.

    Select Don't Host Online
     

​​​​​​Outlook on the web

  • In the new event form, select the Teams meeting toggle to turn it off.

Make all meetings Teams meetings

You can turn on a Calendar option so that all the meetings you schedule from Outlook—including Outlook on the web and mobile—will be held online with Teams.

Note: Depending on the release update schedule for your organization, you may not currently have access to this feature.

Outlook on the desktop

  1. At the top of the Outlook screen, select File > Options.

  2. On the Outlook Options page, select Calendar on the left.

  3. Under Calendar options, select Add online meeting to all meetings.

    Select Add online meeting to all meetings

Outlook on the web

  1. At the top right of the screen, select Settings  Settings button and then View all Outlook settings at the bottom right.

  2. Select Calendar > Events and invitations > Add online meetings to all meetings.

    Select Add online meeting to all meetings

  3. Select Save.

Thanks..!!

Upload files to OneDrive

  1. Go to Office.com and sign in with your personal Microsoft account. 

  2. Select OneDrive in the Office App launcher.

  3. Select Upload and choose Files or Folders.
    Or drag and drop files from your desktop onto the browser window.

Sharing a document in OneDrive

Save photos and videos from your mobile device to OneDrive

With OneDrive on your Android or iOS devices, you can automatically save and backup every photo or video to the cloud.  

Couple take a picture on the beach

Create files and folders in OneDrive

  1. Go to Office.com and sign in with your personal Microsoft account. 

  2. Select OneDrive in the Office App launcher.

  3. Select New, and choose the file type, or Folder

Creating a new item in OneDrive

Share files and folders

  1. Go to Office.com and sign in with your personal Microsoft account. 

  2. Select OneDrive in the Office App launcher.

  3. Select a file or folder, and then select Share on the top menu.

  4. Enter the names or email addresses of the people you want to share with.

  5. Add a message and select Send. Or you can select Copy link and send the link in an email or chat message. 

Thanks..!!


Title: Set up email in the Outlook for Android app.


Set up Outlook for Android


Note: If you have a work account that requires the Microsoft Outlook app, install it from the Google Play Store before setting up Outlook for Android.


Step 1: Install the Outlook for Android app from the Google Play Store and then open it.

Tap Get Started

Click on add email account, open the Menu > Settings > Add Account > Add Email Account. Then skip to step 4 under Set up another email account below.

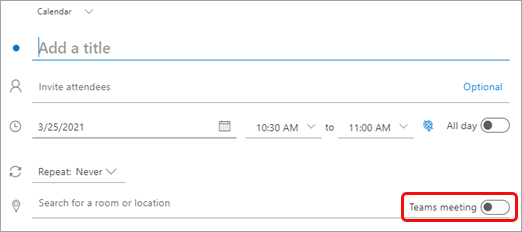
Step 2: Outlook will detect your Email account, here add your email ID for outlook in Android Tap to "Connect Account and then tap to Ok to Confirm.

If you don't want to add these accounts, tap Skip and then go to step 4 under “ Set up another email account below ”.

Step 3: Select the accounts you'd like to add and tap Add Account. You may be asked to sign in.

Tap Allow to confirm the offline access and any other prompts.

To add another email account, tap Continue and go to Step 4, otherwise tap Skip.

Step 4: Set up another email account

1. Enter your full email address, then tap Continue.

Note: If you're asked to choose your provider, you'll have to Set up your Exchange manually or set up an IMAP or POP account.

2. Enter your email account password and Click Sign In or Next.

Note: The sign-in screen may look different as per OS.

3. Outlook will start connecting and will start synchronizing the emails

4. Mail box will appear.

5. Go to Inbox and verify.

Thanks !!

Most popular articles 
 
Newest articles